Using AncestryDNA Groups and Enhanced Shared Matches to sort DNA matches
What Do These Changes Mean for Me?
Here’s how these updates affect my day-to-day DNA work:
I can now create more groups using a wider colour palette.
Group displays have changed, showing group symbols inside coloured boxes.
With enhanced shared matches, I can see not only how much DNA a match shares with me, but also how much they share with each other. For example, Frank shares 824 cM with me and 51 cM with my match JBis.
Matches under 20 cM will now appear on the Shared Matches page if they share at least 20 cM with the match I’m viewing. For example, James shares 50 cM with JBis and just 10 cM with me—but he still appears.

My Sorting Method
I still start with my adapted version of the Leed Method - Twisted Leeds Method:
Divide matches down to 20 cM into likely maternal and paternal groups.
Sort these into the likely four grandparent lines.
Further sorting depends on the DNA question I’m trying to solve—often ending in sixteen 2xGGP (great-great-grandparent) lines.
Whatever sorting process you choose, make sure it’s both systematic and exhaustive:-
- Systematic: Don’t overlook matches, even if they initially go into unknown or uncertain groups.
- Exhaustive: Revisit those uncertain matches or clusters as new matches or information become available.
Remember, you can update or reorganise your groups at any time as your research progresses.
My Colour-Coding System
Here’s how I use coloured boxes to identify group types:
White – Paternal and Maternal lines
Light Blue – Paternal Grandfather (PGF)
Light Green – Paternal Grandmother (PGM)
Pink – Maternal Grandfather (MGF)
Light Mauve – Maternal Grandmother (MGM)
Group symbols appear inside these boxes, allowing quick visual recognition. This has replaced my older system of just marking P or M, which wasn’t informative enough.


Below is the full list of groups I'm currently using on my AncestryDNA test. While they no longer display in strict paternal/maternal order as they did previously, the benefit is that each group now shows a symbol inside its coloured box—something far more informative than the simple "P" or "M" I used before. Keep reading to see how I use each group in my sorting process.
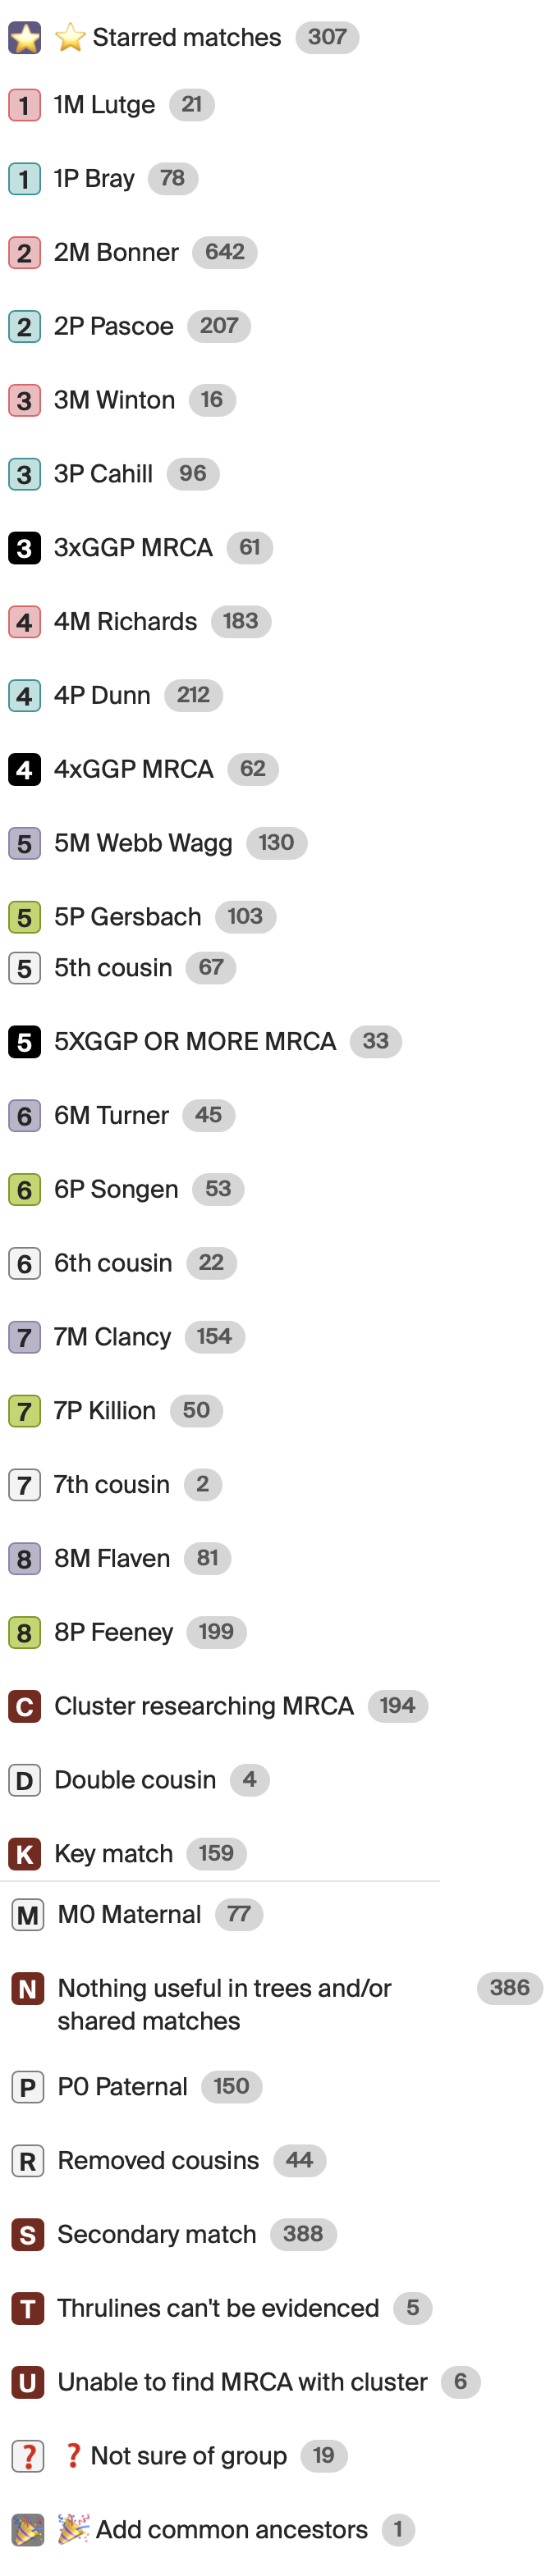

These are the groups I use for the initial sort into the four grandparent lines. As I explore my match list further - especially using enhanced shared matching - I’ve begun adding additional matches to these groups for future investigation. One of the groups is a general “holding group” for matches where I’m unsure which of two lines they belong to. I can revisit these later, once new matches or evidence help clarify the correct placement.


These are the sixteen 2xGGP (great-great-grandparent) groups I’m currently using. I use alphabetic symbols for grandparent and great-grandparent groups, and then switch to numbers for the 2xGGP groups to keep things organised and visually distinct.
When working with matches from other tests, I take a flexible approach. For instance, when sorting a 1C (first cousin), I usually assign matches only to the 2xGGP lines we share. For the parts of their tree that I don’t share, I may group those matches more generally under the appropriate parent or grandparent line.

Next are the groups I use to record information about the Most Recent Common Ancestor (MRCA) and my relationship to the match:
Matches are starred when I’ve gathered DNA evidence to support the relationship, even if it doesn’t yet meet the threshold of “beyond reasonable doubt.”
If the MRCA is beyond my 2xGGPs, I use black boxes with white numbers (e.g. 3, 4, 5) to indicate the generational distance.
Since all relationships beyond 4C are now labelled as “distant” on AncestryDNA, I’ve created groups for 5C, 6C, and 7C, using white boxes with black numbers. These are also used for removed cousins regardless of how many times they’re removed.
I have a dedicated group for double cousins, which helps flag these relationships quickly.
This system avoids the need for detailed notes on every match and provides a helpful visual cue. Assigning matches to these groups also makes them easier to sort and search later.

Finally, I’ve created a set of groups that reflect my active research efforts. These are all marked with brown boxes and white letters. I use them for matches where I’m still trying to identify the Most Recent Common Ancestor (MRCA).
With the help of enhanced shared matches, I’ve found it useful to cluster matches and focus on the one who appears closest to the MRCA with the tester - the “key” match. I then group related matches as “secondary” matches. These can include their children and grandchildren, and depending on the case, may also include siblings, nieces, nephews, or even second cousins. All of these are grouped together as a “cluster researching MRCA.”
Sometimes, I can tell a match belongs in a cluster, but I haven’t yet worked out how they connect. Those go into my “C” and “U” groups.
I use the “N” group when a match has no tree or an unhelpful tree - this saves me from repeatedly checking the same dead ends.
Lastly, I use the “T” group for cases where ThruLines suggests a connection that I can’t support with either DNA matches or documentary evidence. This helps flag questionable suggestions for further review.

I’m always happy to hear how others are using these features - or to answer any questions you might have. Please feel free to get in touch via the blog’s contact form.
Happy sorting!